(Complete overhaul with changes in formatting, new sections, more information, and up to date information) |
m (→Conditions) Tag: Source edit |
||
| (19 intermediate revisions by 15 users not shown) | |||
| Line 1: | Line 1: | ||
| − | [[File:Loot.jpg| |
+ | [[File:Loot.jpg|350px|right|thumb]] |
| + | [[File:Loot_Store.png|350px|right|thumb]] |
||
| Line 7: | Line 8: | ||
<!-- Categories of Loot --> |
<!-- Categories of Loot --> |
||
== Types of Loot == |
== Types of Loot == |
||
| − | To better organize [[DayZ |
+ | To better organize [[DayZ|DayZ's]] 900+ items, every item has been sorted into one of four primary categories of loot based on the type of item it is. Items sorted into these categories: [[Loot#Equipment|Equipment]], [[Loot#Food & Drink|Food & Drink]], [[Loot#Resources|Resources]], and [[Loot#Weapons|Weapons]], may then be additionally sorted into subcategories. |
Below is a brief overview of each of the four primary categories and the types of loot they contain. |
Below is a brief overview of each of the four primary categories and the types of loot they contain. |
||
| Line 17: | Line 18: | ||
{{Equipment Box Template |
{{Equipment Box Template |
||
| name = Base Building |
| name = Base Building |
||
| − | | link = |
+ | | link = Equipment#Base Building |
| img = MetalSheets.png |
| img = MetalSheets.png |
||
|}} |
|}} |
||
| Line 23: | Line 24: | ||
{{Equipment Box Template |
{{Equipment Box Template |
||
| name = Clothing |
| name = Clothing |
||
| − | | link = |
+ | | link = Equipment#Clothing |
| img = Green Check Shirt.png |
| img = Green Check Shirt.png |
||
|}} |
|}} |
||
| Line 29: | Line 30: | ||
{{Equipment Box Template |
{{Equipment Box Template |
||
| name = Communication |
| name = Communication |
||
| − | | link = |
+ | | link = Equipment#Communication |
| img = WalkieTalkie.png |
| img = WalkieTalkie.png |
||
|}} |
|}} |
||
| Line 35: | Line 36: | ||
{{Equipment Box Template |
{{Equipment Box Template |
||
| name = Crafting |
| name = Crafting |
||
| − | | link = |
+ | | link = Equipment#Crafting |
| img = Metal wire.png |
| img = Metal wire.png |
||
|}} |
|}} |
||
| Line 41: | Line 42: | ||
{{Equipment Box Template |
{{Equipment Box Template |
||
| name = Horticulture |
| name = Horticulture |
||
| − | | link = |
+ | | link = Equipment#Horticulture |
| img = GardenLime.png |
| img = GardenLime.png |
||
|}} |
|}} |
||
| Line 47: | Line 48: | ||
{{Equipment Box Template |
{{Equipment Box Template |
||
| name = Light Sources |
| name = Light Sources |
||
| − | | link = |
+ | | link = Equipment#Light Sources |
| img = Flashlight.png |
| img = Flashlight.png |
||
|}} |
|}} |
||
| Line 53: | Line 54: | ||
{{Equipment Box Template |
{{Equipment Box Template |
||
| name = Medical |
| name = Medical |
||
| − | | link = |
+ | | link = Equipment#Medical |
| img = Bandage new.png |
| img = Bandage new.png |
||
|}} |
|}} |
||
| Line 59: | Line 60: | ||
{{Equipment Box Template |
{{Equipment Box Template |
||
| name = Storage |
| name = Storage |
||
| − | | link = |
+ | | link = Equipment#Personal Storage |
| img = AmmoBox.png |
| img = AmmoBox.png |
||
|}} |
|}} |
||
| Line 65: | Line 66: | ||
{{Equipment Box Template |
{{Equipment Box Template |
||
| name = Power Source |
| name = Power Source |
||
| − | | link = |
+ | | link = Equipment#Power Source |
| img = Alkaline Battery (9V).png |
| img = Alkaline Battery (9V).png |
||
|}} |
|}} |
||
| Line 71: | Line 72: | ||
{{Equipment Box Template |
{{Equipment Box Template |
||
| name = Protective Gear |
| name = Protective Gear |
||
| − | | link = |
+ | | link = Equipment#Protective Gear |
| img = Plate Carrier.png |
| img = Plate Carrier.png |
||
|}} |
|}} |
||
| Line 77: | Line 78: | ||
{{Equipment Box Template |
{{Equipment Box Template |
||
| name = Repair Kits |
| name = Repair Kits |
||
| − | | link = |
+ | | link = Equipment#Repair Kits |
| img = Weapon Cleaning Kit.png |
| img = Weapon Cleaning Kit.png |
||
|}} |
|}} |
||
| Line 83: | Line 84: | ||
{{Equipment Box Template |
{{Equipment Box Template |
||
| name = Survival |
| name = Survival |
||
| − | | link = |
+ | | link = Equipment#Survival |
| img = Compass.png |
| img = Compass.png |
||
|}} |
|}} |
||
| Line 89: | Line 90: | ||
{{Equipment Box Template |
{{Equipment Box Template |
||
| name = Tools |
| name = Tools |
||
| − | | link = |
+ | | link = Equipment#Tools |
| img = Hacksaw1.png |
| img = Hacksaw1.png |
||
|}} |
|}} |
||
| Line 95: | Line 96: | ||
{{Equipment Box Template |
{{Equipment Box Template |
||
| name = Vehicle Parts |
| name = Vehicle Parts |
||
| − | | link = |
+ | | link = Equipment#Vehicle Parts |
| img = SparkPlug 1.png |
| img = SparkPlug 1.png |
||
|}} |
|}} |
||
| Line 101: | Line 102: | ||
{{Equipment Box Template |
{{Equipment Box Template |
||
| name = Miscellaneous |
| name = Miscellaneous |
||
| − | | link = |
+ | | link = Equipment#Misc. |
| img = Handcuffs.png |
| img = Handcuffs.png |
||
|}} |
|}} |
||
| Line 229: | Line 230: | ||
<!-- Item Stats --> |
<!-- Item Stats --> |
||
| + | |||
== Item Stats == |
== Item Stats == |
||
''Main Article: [[Item Stats]]''<br /><br /> |
''Main Article: [[Item Stats]]''<br /><br /> |
||
| Line 284: | Line 286: | ||
| 100 - 71 |
| 100 - 71 |
||
|} |
|} |
||
| − | Items in this condition will generally appear new or unused. This condition is largely only possible for items found in the world as loot, since repair kits are not able to repair most items beyond worn condition. |
+ | Items in this condition will generally appear new or unused. This condition is largely only possible for items found in the world as loot, since repair kits are not able to repair most items beyond worn condition, unless the soft skill for repairs have been maxed. |
{|class="wikitable" |
{|class="wikitable" |
||
| Line 387: | Line 389: | ||
The '''Central Loot Economy''' (often abbreviated "CLE") is DayZ's unique management system for loot spawning and clean-up. It is a complex system of tags, categories, zones, maximums, minimums, averages, and so on. The CLE dictates exactly how many of each item can be present on a single instance of the game at a time (one server), with important factors like randomization and rarity baked in. These values can be adjusted at any time, without requiring players or servers to install a game update. |
The '''Central Loot Economy''' (often abbreviated "CLE") is DayZ's unique management system for loot spawning and clean-up. It is a complex system of tags, categories, zones, maximums, minimums, averages, and so on. The CLE dictates exactly how many of each item can be present on a single instance of the game at a time (one server), with important factors like randomization and rarity baked in. These values can be adjusted at any time, without requiring players or servers to install a game update. |
||
| − | In addition to controlling how much of each item is present, it also "cleans up" the map by removing items which have become ruined or which have gone untouched for a set amount of time. This function prevents the game from becoming cluttered with useless items, serves players with a continually refreshed pool of available gear, acts as one method of preventing individual players from having too much influence over the entire server's economy. For more information about how long items stay in place without activity, please see the table below for ''Persistence''. |
+ | In addition to controlling how much of each item is present, it also "cleans up" the map by removing items which have become ruined or which have gone untouched for a set amount of time. This function prevents the game from becoming cluttered with useless items, serves players with a continually refreshed pool of available gear, and acts as one method of preventing individual players from having too much influence over the entire server's economy. For more information about how long items stay in place without activity, please see the table below for ''Persistence''. |
<!-- Spawning --> |
<!-- Spawning --> |
||
| Line 412: | Line 414: | ||
! Persistence Time |
! Persistence Time |
||
|- |
|- |
||
| − | | [[Oil Barrel|Oil Barrels]], [[Sea Chest|Sea Chests]], [[Wooden |
+ | | [[Oil Barrel|Oil Barrels]], [[Sea Chest|Sea Chests]], [[Wooden Crate|Wooden Crates]] |
|style="text-align: center; font-weight: bold;" | 45 Days |
|style="text-align: center; font-weight: bold;" | 45 Days |
||
|- |
|- |
||
| Line 425: | Line 427: | ||
|- |
|- |
||
| Underground Stashes |
| Underground Stashes |
||
| − | |style="text-align: center; font-weight: bold;" | |
+ | |style="text-align: center; font-weight: bold;" | 14 Days |
|- |
|- |
||
| [[Equipment#Electricity|Battery Chargers, Cable Reels, Generators, Spotlights]] |
| [[Equipment#Electricity|Battery Chargers, Cable Reels, Generators, Spotlights]] |
||
| Line 448: | Line 450: | ||
== Inventory System & Storage == |
== Inventory System & Storage == |
||
| − | Loot can be picked up by pressing the action key ({{Key|F}} by default) while looking at it, or from the "Vicinity" window on the left side of the player's inventory screen. From the vicinity window, items can either be dragged and dropped somewhere into the player's inventory or double-clicked to get automatically placed in the first available inventory slot(s) |
+ | Loot can be picked up by pressing the action key ({{Key|F}} by default) while looking at it, or from the "Vicinity" window on the left side of the player's inventory screen. From the vicinity window, items can either be dragged and dropped somewhere into the player's inventory or double-clicked to get automatically placed in the first available inventory slot(s). |
=== Inventory & UI === |
=== Inventory & UI === |
||
| − | ''Main Article: [[User Interface]]'' |
+ | ''Main Article: [[User Interface]]'' |
{{:User Interface#Inventory}} |
{{:User Interface#Inventory}} |
||
=== Item Size & Weight === |
=== Item Size & Weight === |
||
''See Also: [[Stamina#Character Load Weight|Stamina]]''<br /><br /> |
''See Also: [[Stamina#Character Load Weight|Stamina]]''<br /><br /> |
||
| − | Items can be managed and stored in a player's inventory ({{Key|Tab}} by default) or held in their hands. An item's inventory size is represented in rows and columns (e.g. 1x1, 2x3, 4x4) in the inventory screen. |
+ | Items can be managed and stored in a player's inventory ({{Key|Tab}} by default) or held in their hands. An item's inventory size is represented in rows and columns (e.g. 1x1, 2x3, 4x4) in the inventory screen. Items can be rotated by dragging the item and pressing spacebar. |
In addition to size, all items have '''Weight''' to them as well. While an item's '''Weight''' generally does not change the speed at which a character uses the item (for items that impede movement or actions see: [[Item Stats|Heavy Items]]) an item's weight adds to the overall load a [[Survivors|survivor]] is carrying. The more load weight a survivor has, the less maximum [[Stamina]] he or she will have available. |
In addition to size, all items have '''Weight''' to them as well. While an item's '''Weight''' generally does not change the speed at which a character uses the item (for items that impede movement or actions see: [[Item Stats|Heavy Items]]) an item's weight adds to the overall load a [[Survivors|survivor]] is carrying. The more load weight a survivor has, the less maximum [[Stamina]] he or she will have available. |
||
Revision as of 11:28, 17 November 2021
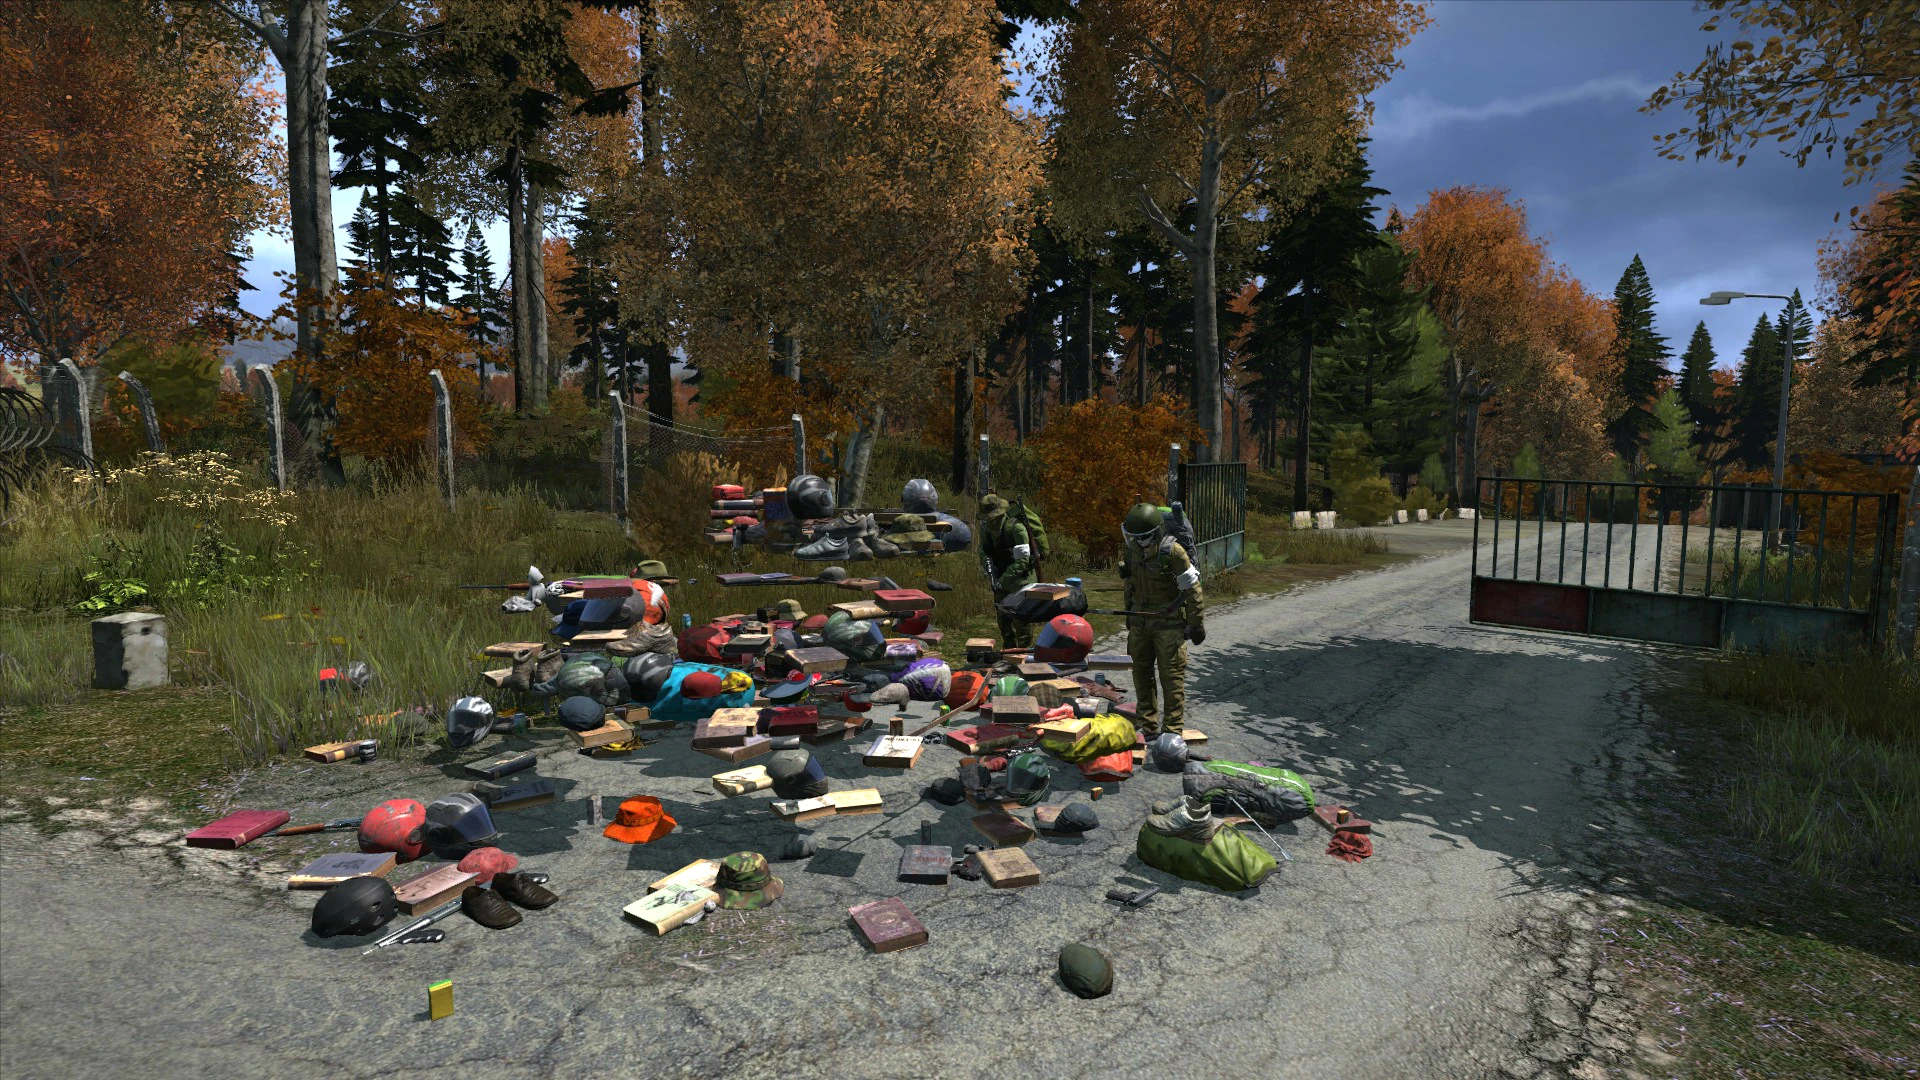
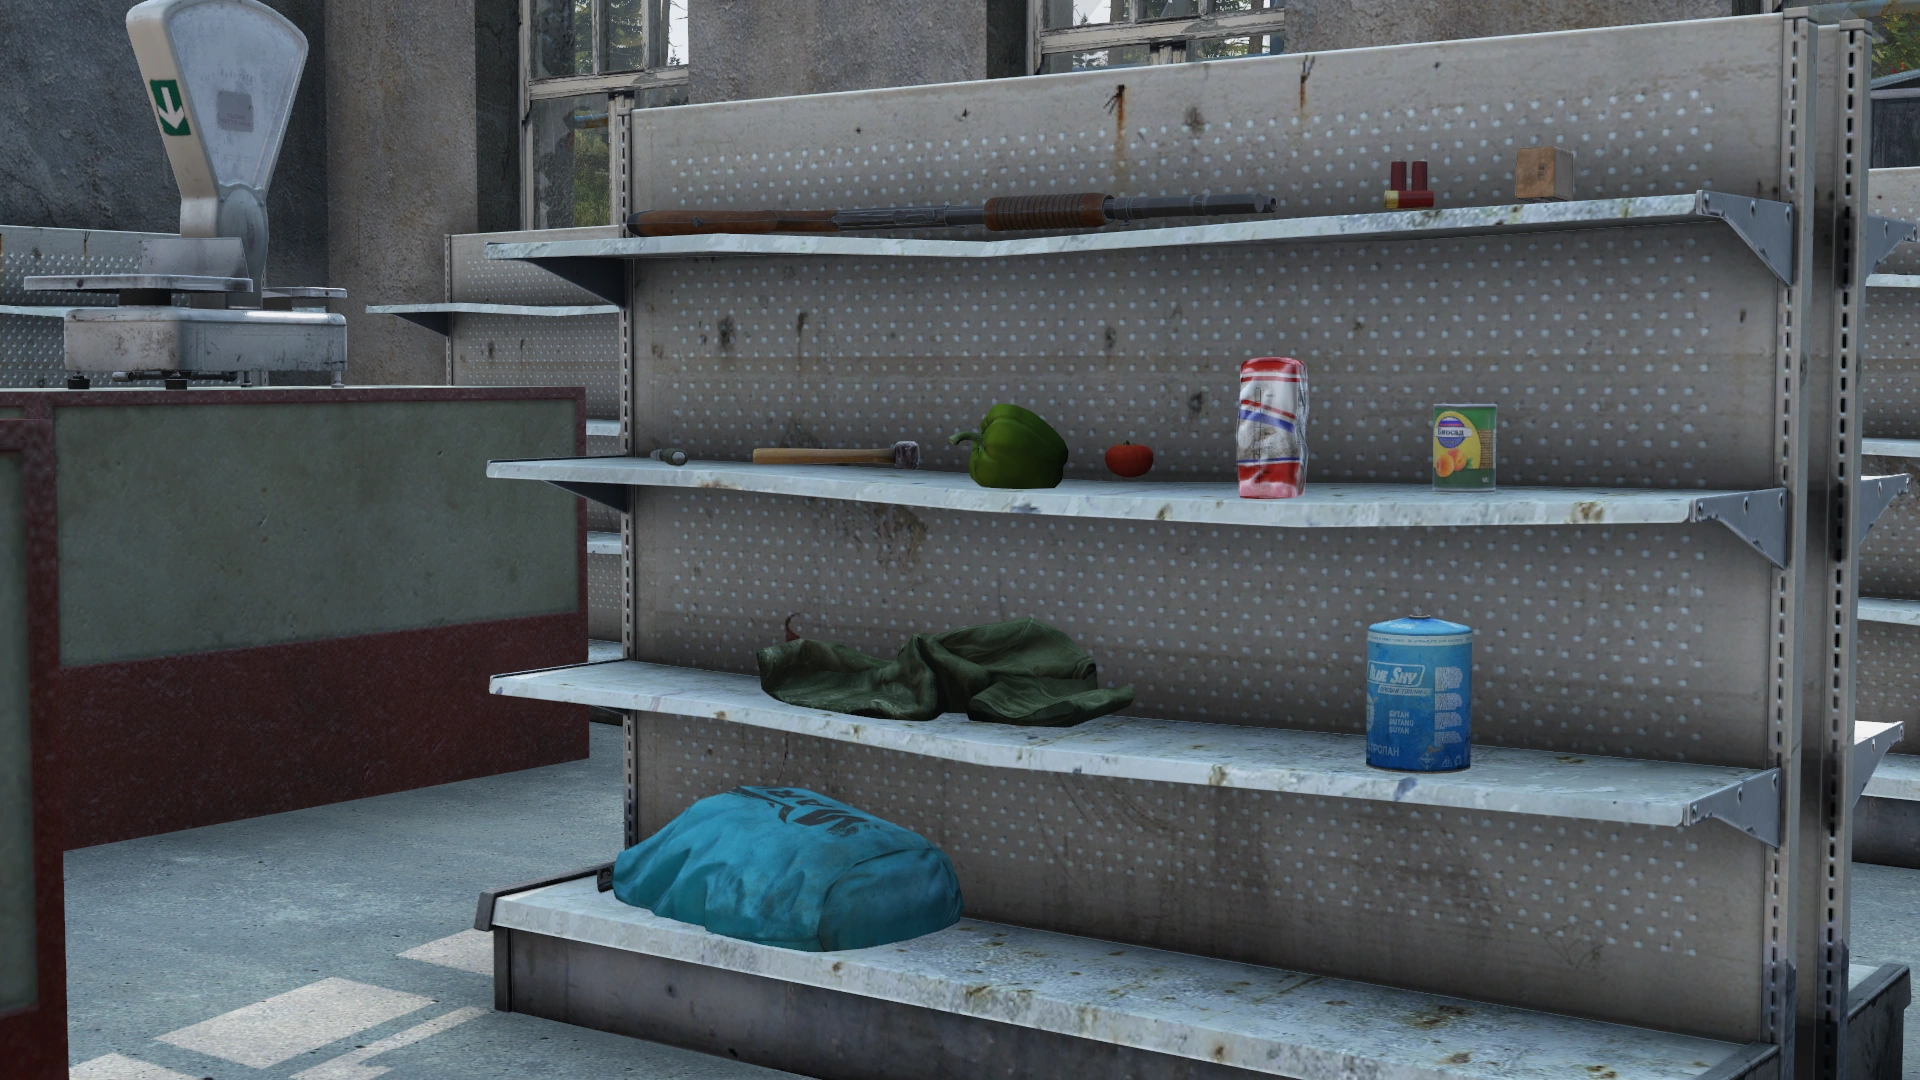
Loot refers to any item that can be found, crafted or harvested and used by a survivor. Loot can be found in almost all enterable buildings (e.g. houses, hospitals, barns), inside and around many derelict vehicles, and in the vicinity of dynamic event spawns like helicopter crashes and police cars. It can also be picked up from other players and found on the corpses of the infected. In addition to items spawning individually, they can also be found inside of clothing and backpacks, and attachments can spawn at random on appropriate weapons.
Types of Loot
To better organize DayZ's 900+ items, every item has been sorted into one of four primary categories of loot based on the type of item it is. Items sorted into these categories: Equipment, Food & Drink, Resources, and Weapons, may then be additionally sorted into subcategories.
Below is a brief overview of each of the four primary categories and the types of loot they contain.
Equipment
Main Article: Equipment
Equipment, the largest of the four primary categories of loot in DayZ Standalone, refers to any item or tool that can be worn or used for specific purpose. Since equipment covers such a vast array of item types, uses and consumability. Being such a large and broad category, equipment is broken down into several smaller categories, which may in turn have their own subcategories, based on the item's primary use.


Food & Drink
Main Article: Food & Drink
Food & Drink, one of the four primary categories of loot in DayZ Standalone, refers to any item or liquid that can be consumed by a survivor for sustenance. Used to replenish a survivor's energy and hydration.


Resources
Main Article: Resources
Resources, one of the four primary categories of loot in DayZ Standalone, refers to any item or material whose primary purpose is either in the creation of another object or as a fuel source. Additionally, resources do not spawn like normal items. They instead must be harvested or collected from the landscape, vegetation, wildlife or specific locations around Chernarus.
Weapons
Main Article: Weapons
Weapons, one of the four primary categories of loot in DayZ Standalone, refers to any wield-able item that a player can use to injure or kill wildlife, the Infected or even other survivors. Weapons also includes ammunition, attachments and magazines used with firearms or other ranged weapons.


Item Stats
Main Article: Item Stats
Item Stats refers to a particular characteristic or attribute that and item or object has. All items, vehicles, objects and structures in DayZ Standalone have a set of stats. Although there are dozens of stats that an item or object can have, not every item or object may have that particular stat.
Below is a list of common stats that are found on just about every item in DayZ Standalone.
| Stat | Definition |
|---|---|
| Absorbency | How much water an item can absorb. The lower the value, the more water resistant it is with 0 being water proof. |
| Item Size | How much inventory space an item takes up. |
| Repairable With | If an item can be repaired, which repair kits are used. |
| Weight | How much an item weighs. |
Item Condition
A measure of an item's integrity, Item Condition can be thought of as an item's Health. Items, like Survivors, can be thought of as having 100 Health.
| Condition | Health |
|---|---|
| Pristine | 100 - 71 |
| Worn | 70 - 41 |
| Damaged | 40 - 21 |
| Badly Damaged | 20 - 1 |
| Ruined | 0 |
An item's condition, generally, decreases with use, but can also become damaged in combat. As an item's condition begins to deteriorate, it's appearance will also change, refelecting the condition it is in. An item's condition will also be listed when the item is selected in the inventory screen.
Conditions
| Pristine | 100 - 71 |
Items in this condition will generally appear new or unused. This condition is largely only possible for items found in the world as loot, since repair kits are not able to repair most items beyond worn condition, unless the soft skill for repairs have been maxed.
| Worn | 70 - 41 |
Items in this state are visually indistinguishable from items in pristine condition. There is generally little to no impact on the functionality or use of an item in this condition. This is the best condition an item that has been repaired to.
| Damaged | 40 - 21 |
When an item is in this condition, it will appear heavily used: looking damaged, cracked and scratched. This condition may have some impact on the functionality or use of the item, causing unintended effects or, occasionally, no effect at all.
| Badly Damaged | 20 - 1 |
Well-used items will end up in this condition, which is visually similar to the damaged state. Items in this condition may not be fully functional and frequently fail to work properly. They are on the verge of becoming ruined and, if possible, should be repaired immediately.
| Ruined | 0 |
Once an item has been used or damaged to the point of becoming ruined, it can no longer be repaired at all and is permanently reduced to near-uselessness. Items in this condition are visually similar to damaged and badly damaged, but will also appear to be discolored or darker than those states. They may no longer be usable, or will cease to function entirely.
Repairing
Main Article: Item Repair
See also: Repair list
In order to combat an item's decline in condition, many items in DayZ Standalone can be repaired. Whether the item was found in poor condition, damaged in combat or even damaged from general wear and tear, as long as the item is not Ruined, it can be repaired.
In order to repair an item a Repair Kit is needed. The type of Repair Kit needed to fix an item is based on the type of item it is. In some cases, if no Repair Kit is available, Duct Tape may be used to repair the item as well.
To repair an item, hold the required Repair Kit in your hands and drag the damaged items onto the Repair Kit. Repairing is a Continuous Action, so the player will need to hold down the Use Action button until the Repair Action is complete. The amount of repair done to the item is based on the Repair Kit that was used and is also affected by the Soft Skill System.
Items that are Damaged or Badly Damaged can be repaired up to Worn, but not Pristine. Ruined items are irreparably damaged and can not be fixed.
- Repair Kits


Central Loot Economy
Main Article: Central Loot Economy
The Central Loot Economy (often abbreviated "CLE") is DayZ's unique management system for loot spawning and clean-up. It is a complex system of tags, categories, zones, maximums, minimums, averages, and so on. The CLE dictates exactly how many of each item can be present on a single instance of the game at a time (one server), with important factors like randomization and rarity baked in. These values can be adjusted at any time, without requiring players or servers to install a game update.
In addition to controlling how much of each item is present, it also "cleans up" the map by removing items which have become ruined or which have gone untouched for a set amount of time. This function prevents the game from becoming cluttered with useless items, serves players with a continually refreshed pool of available gear, and acts as one method of preventing individual players from having too much influence over the entire server's economy. For more information about how long items stay in place without activity, please see the table below for Persistence.
Loot Spawning
Main Article: Loot Spawning
The first major role of the Central Loot Economy is managing the spawning of loot around Chernarus. In DayZ Standalone rather than having random loot spawn at specific locations around the world, the Central Loot Economy manages every item that can spawn, the amount of the item that can spawn and the locations where the item can spawn. In order to select from the over 10,000 potential spawn locations, every item and building in the game has a set of Category and Location tags that the Central Loot Economy uses to determine which items can spawn at what locations. Additionally, some items have a set of Zones, specific areas on the map, in which they are able to spawn, further increasing the variety of loot around Chernarus.
Once an item's location has been detemined, the Central Loot Economy will then randomly determine the condition the item spawns-in with and, if applicable, attachments or additional items that spawn on or within the spawning item itself.
Using these tags, zones, conditions, attachments or items within the item along with some additional item spawning stats, the Central Loot Economy spawns loot in places that make sense while still allowing for a wide variety of locations or "variants" of the item, ensuring that players get a fresh but not completely random experience each time they loot a building.
Persistence
Main Article: Persistence
See Also: List of Item Cleanup times
The second major role of the Central Loot Economy is commonly refered to as Persistence. When players refer to an item, object or structure as being "Persistent ", what they mean is the item, object or structure does not despawn or move during a server restart and has a very long Item Cleanup time, or the amount of time before an object is despawned by the Central Loot Economy. While Persistence does prevent things like oil barrels and player-made fortifications from despawning, that is only part of what it does. As part of its Persistence System, the Central Loot Economy also manages other "non-persistant" loot that has spawned and performs Item Cleanup where necessary. This aspect of the Persistence System serves to keep fresh loot spawning and prevents the server from getting bogged-down with discarded, ruined or otherwise unused items.
The length of time an item, object or structure is in the world before the Central Loot Economy despawns it, varies based on the object itself. If, at any point, the object is interacted with in any way, its Item Cleanup timer will reset. Essentially, Persistent objects that are regularly used or interacted with will never despawn (assuming they do not become ruined or the server is not wiped).
*Note: Item Cleanup/Persistence time does not apply to anything carried by a player. These items will not despawn.
| Items | Persistence Time |
|---|---|
| Oil Barrels, Sea Chests, Wooden Crates | 45 Days |
| Tents | 45 Days |
| Ammo Boxes, Protective Cases | 45 Days |
| Fences, Watchtowers, Wire Mesh Barriers | 45 Days |
| Underground Stashes | 14 Days |
| Battery Chargers, Cable Reels, Generators, Spotlights | 7 Days |
| Car Battery, Truck Battery | 12 Hours |
| Backpacks* | 6 Hours |
| Garden Plot, Garden Plants | 6 Hours |
| All Other Objects | 15 Minutes - 4 Hours |
* Except Fur Courier Bag and Fur Backpack
Inventory System & Storage
Loot can be picked up by pressing the action key (F by default) while looking at it, or from the "Vicinity" window on the left side of the player's inventory screen. From the vicinity window, items can either be dragged and dropped somewhere into the player's inventory or double-clicked to get automatically placed in the first available inventory slot(s).
Inventory & UI
Main Article: User Interface
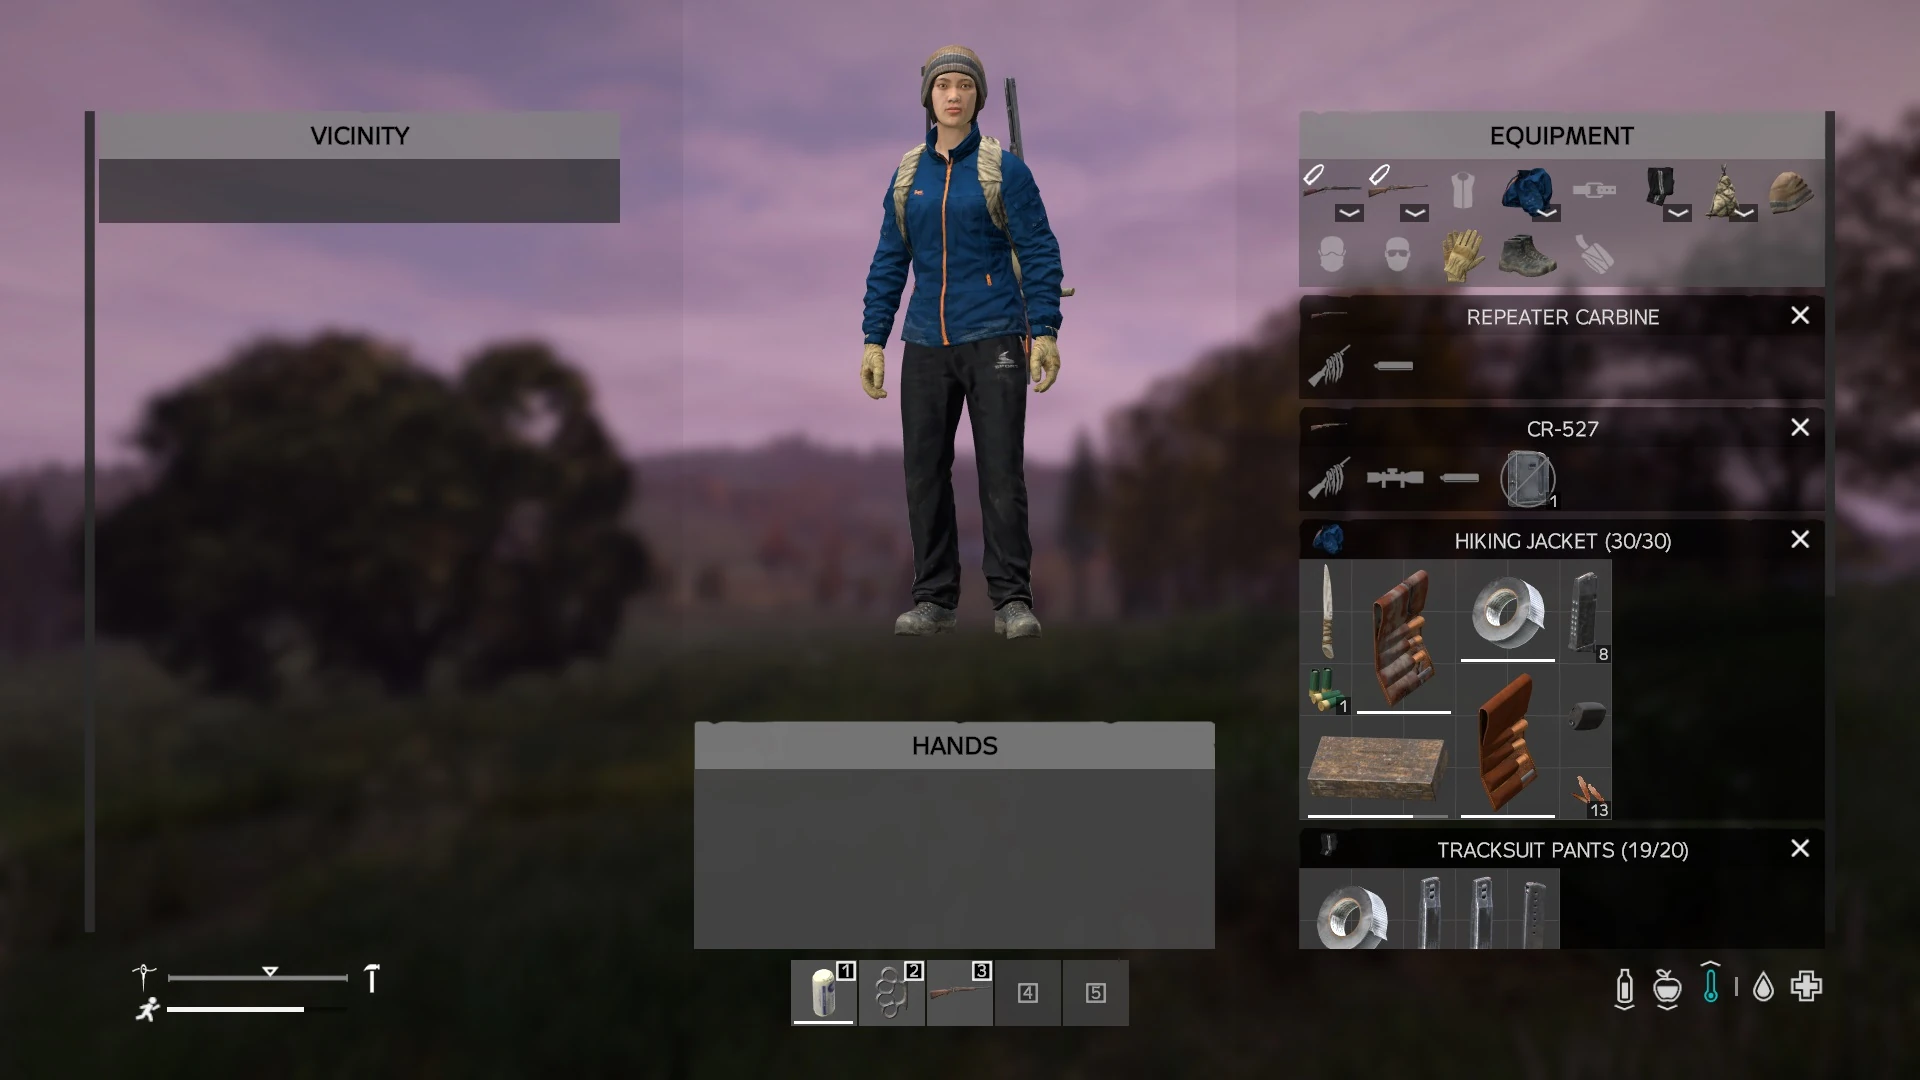
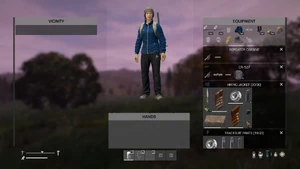
An example of a player's Inventory screen
Your Inventory is the screen where you can access and manipulate all of the items on your person and those on the ground in close proximity to you. To view your character's inventory, you need to press the Tab ↹ key by default.
Though this screen is used to display a number of things, when a player refers to their "inventory" what they really mean is the space (or "slots") in which equipment and weapons are stored and kept on a character. The number of inventory slots available for you to use will vary depending on what kind of clothing you are wearing and whether or not you are equipped with a backpack. Different items of clothing will have a differing number of slots depending upon how many pockets they have, for example, and can be arranged in many different ways (6 rows x 2 columns vs. 4 rows x 3 columns for the same number of total slots). Certain pieces of equipment, such as the Chest Holster, can only hold a specific kind of item (in this case, a handgun).
You can also use your Inventory tab to view items on the ground in your vicinity and either pick them up, use them, or use them in crafting. While you are in the Inventory screen you can choose to craft items, eat food or drink beverages, use medical supplies on yourself or others, and manage your supplies. You can also use the Inventory screen to assign items to what is known as the "hotbar" at the bottom of your screen in order to quickly use them with one key press; all you have to do is click and drag an item to the desired slot -- 1 through 10 -- at the bottom of the screen. The number of available slots on your hotbar is determined by the clothing you are wearing; generally speaking, the more slots that a piece of clothing has itself, the more likely it is to contribute additional slots to the hotbar as well.
In addition to being used for the management of your gear, the Inventory screen is also employed to present information about the character you are playing. The center part of this screen displays a zoom-able, full-body view of your character which can also be rotated for a complete review. This is useful for telling, at a glance, what the condition of your clothing is at that moment. Above that and to the right you'll find status indicator icons that represent a multitude of player health conditions such as energy, hydration, temperature, etc.
Sections of Your Inventory Screen

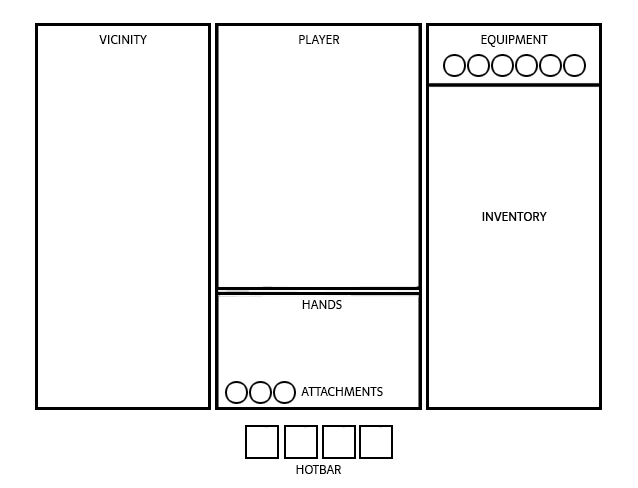
Inventory screen sections
- Vicinity - Items in a player's vicinity that the player is not carrying. Only displays items in very close proximity to your current position. To pick up an item, click and drag it into your inventory with the left mouse button, or alternatively double-clicking it with the left mouse button will add it to your inventory if there is enough space available.
- Character - Visualization of a player's character. Displays which clothes the player is wearing at the moment, as well as status indicator icons related to player health.
- Hands - Displays the item that the player is currently holding in their hands. Your view of this item can be rotated by clicking and holding the left mouse button.
- Inventory - Items that the player is currently carrying. To rearrange items, click and hold the left mouse button over an item and drag it to another open area of your inventory.
- Equipped items - On the top of the fourth panel there are slots where uniforms and other accessories and weapons take place. (0.63)
- Attachment Slots - Attachments that are currently equipped to the item being viewed, either in the player's hands or on the ground. Attachments can be detached or reattached by dragging them from the weapon or dragging them on top of it.
- Hotbar - Items from the player's inventory can be assigned to each of these slots. Each slot corresponds with a number (1 to 0 from left to right at the top of your keyboard). The number of available slots on your hotbar is determined by the clothing you are wearing, and these slots are not for storage; they are only used for assigning key bindings. Once a hotbar slot is assigned to an item by dragging the item into the slot, the player can put it into their hands slot without entering the inventory screen by pressing the corresponding number key. It can then be put away afterward by pressing the same assigned key again.
Item Size & Weight
See Also: Stamina
Items can be managed and stored in a player's inventory (Tab ↹ by default) or held in their hands. An item's inventory size is represented in rows and columns (e.g. 1x1, 2x3, 4x4) in the inventory screen. Items can be rotated by dragging the item and pressing spacebar.
In addition to size, all items have Weight to them as well. While an item's Weight generally does not change the speed at which a character uses the item (for items that impede movement or actions see: Heavy Items) an item's weight adds to the overall load a survivor is carrying. The more load weight a survivor has, the less maximum Stamina he or she will have available.